> For the complete documentation index, see [llms.txt](https://docs.contiple.com/llms.txt). Markdown versions of documentation pages are available by appending `.md` to page URLs; this page is available as [Markdown](https://docs.contiple.com/eng/try-it-out/cm/additinal-business.md).
# Additional Business Management
The Additional Features menu in Contiple allows you to manage supplementary functions such as Callback Management, SMS Sending, and Dashboards.
***
## ➊ Callback Management
{% hint style="info" %}
The **Additional Features** menu in **Contiple** allows you to manage supplementary functions such as **Callback Management**, **SMS Sending**, and **Dashboards**.
{% endhint %}
{% hint style="danger" %}
**Permissions and Requirements**
* In the contract details of the currently connected service, set **\[Additional Tasks] → \[Callback]** to **Enabled**.
* Only administrators or agents with **phone permissions** can access this menu.
{% endhint %}
### **1-1. Accept Callback**
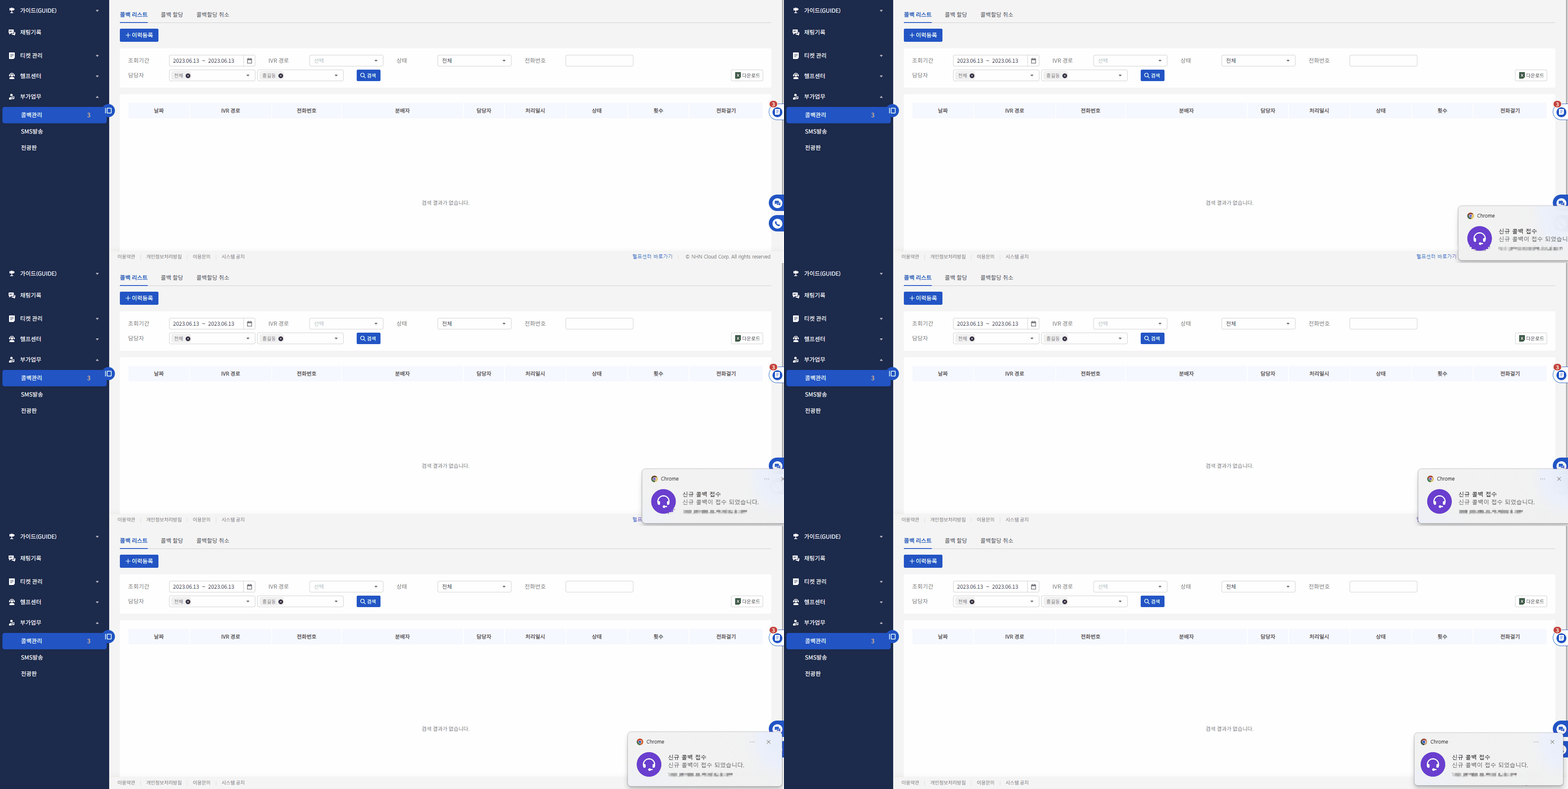
* When a callback is received from a customer or assigned to an agent, a browser notification is displayed.
* Callback notifications are shown to administrators and agents with **phone permissions**.
***
### **1-2. Callback List**
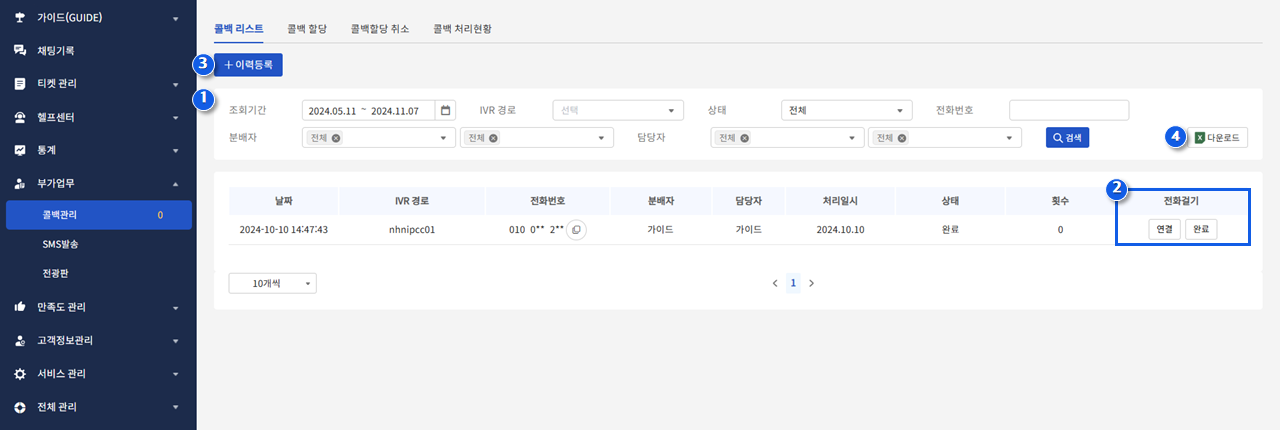
* While logged in to CTI, click the **Connect** button in the callback list to make a call.\
(For agents, the **Connect** and **Complete** buttons are displayed only for callbacks assigned to themselves.)
* When a call is connected, a ticket is automatically created based on the **Outbound Ticket Auto-Creation** settings under **\[General Management] → \[CTI Management]**.
* After the call, click the **Complete** button to change the callback request status to **Completed**.
* Regardless of callback requests, you can click the **Register History** button to create a separate ticket and log the interaction.
***
### **1-3. Callback Assign**
{% hint style="info" %}
* This menu allows you to assign received callback requests to agents.
* Only administrators or agents with **callback assignment permissions** can use this feature.
{% endhint %}
* This menu allows you to assign received callback requests to agents.\
Only administrators or agents with **callback assignment permissions** can use this feature.
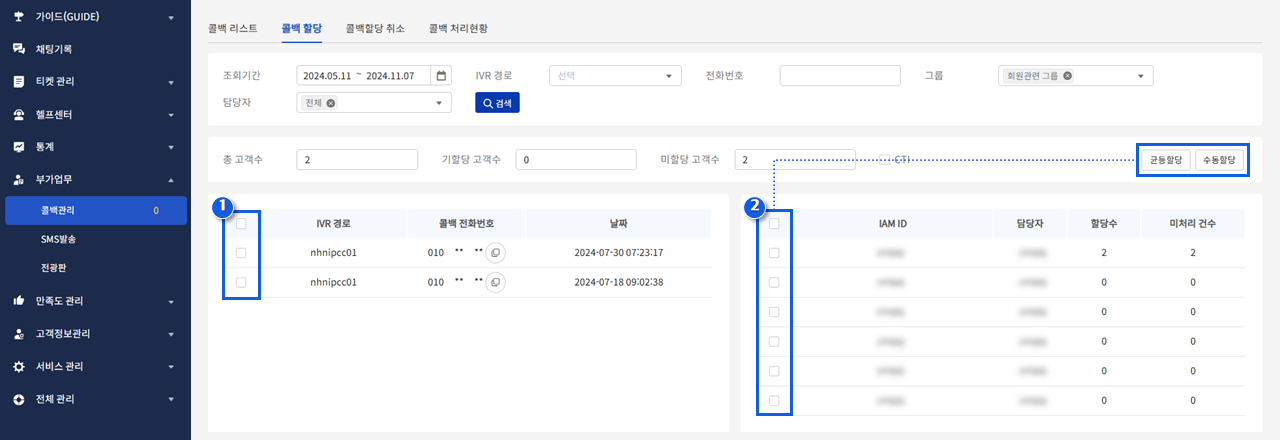
* Select the callback requests to be assigned from the **Assigned Callback List**.
* On the right side of the screen, check the agents who have **phone permissions**.
* After selecting the callbacks to assign, click **Distribute Evenly** or **Assign Manually** at the top right.
* **Average Assign** : Assigns one callback each to the selected agents.
* **Manual Assign** : Assigns all selected callbacks to a single agent. (Only one agent can be selected in this case.)
***
### **1-4. Callback Unassign**
{% hint style="info" %}
* This menu allows agents to cancel assigned callback requests.
* Only administrators or agents with **callback assignment permissions** can use this feature.
{% endhint %}
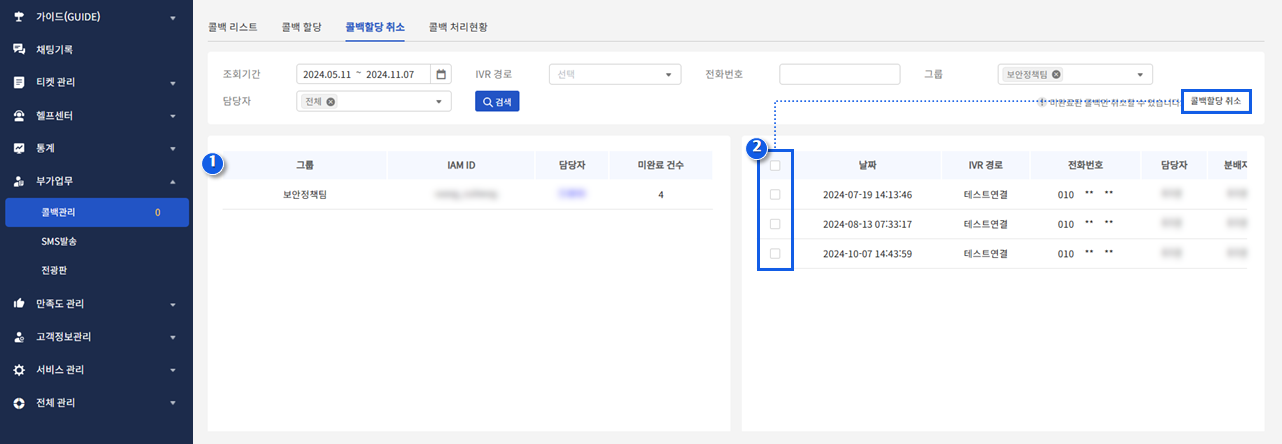
* On the left side of the screen, the number of **incomplete callbacks per agent** is displayed.\
This allows you to check how many callbacks are currently assigned to each agent.
* On the right side, all **incomplete callback requests** are listed.
* Select the callback requests you want to cancel, then click the **Cancel Callback Assignment** button at the top right.
* Canceled callback requests can be reassigned to agents from the **Callback Assignment** tab.
***
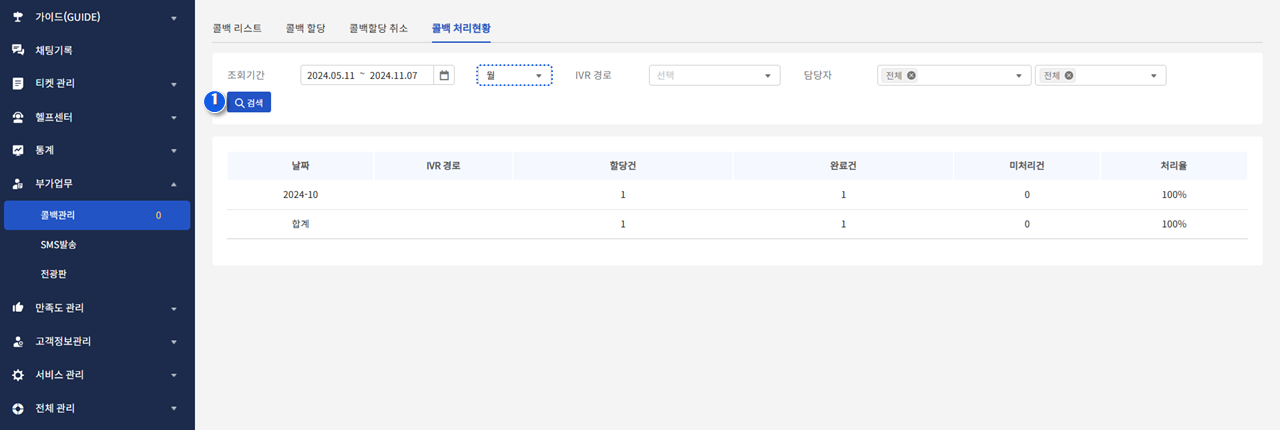
### **1-5. Callback Processing Status**
{% hint style="info" %}
* This menu allows you to view **callback assignments** and **processing status**.
* Only users with **administrator permissions** can access this menu.
{% endhint %}
***
## **➋ SMS Send**
{% hint style="info" %}
* This feature allows you to send text messages to customers by integrating with **NHN Cloud Notification**.
* For more details, refer to the **External Channel Guide**.
{% endhint %}
{% hint style="danger" %}
**Permissions and Requirements**
To use this menu, enable the feature under **\[Service Management] → \[External Channels] → \[SMS]**.
{% endhint %}
### **2-1. Templete Management**
> SMS 발송 시 사용할 수 있는 템플릿 분류와 분류에 따른 SMS/MMS용 템플릿을 관리하는 메뉴입니다.
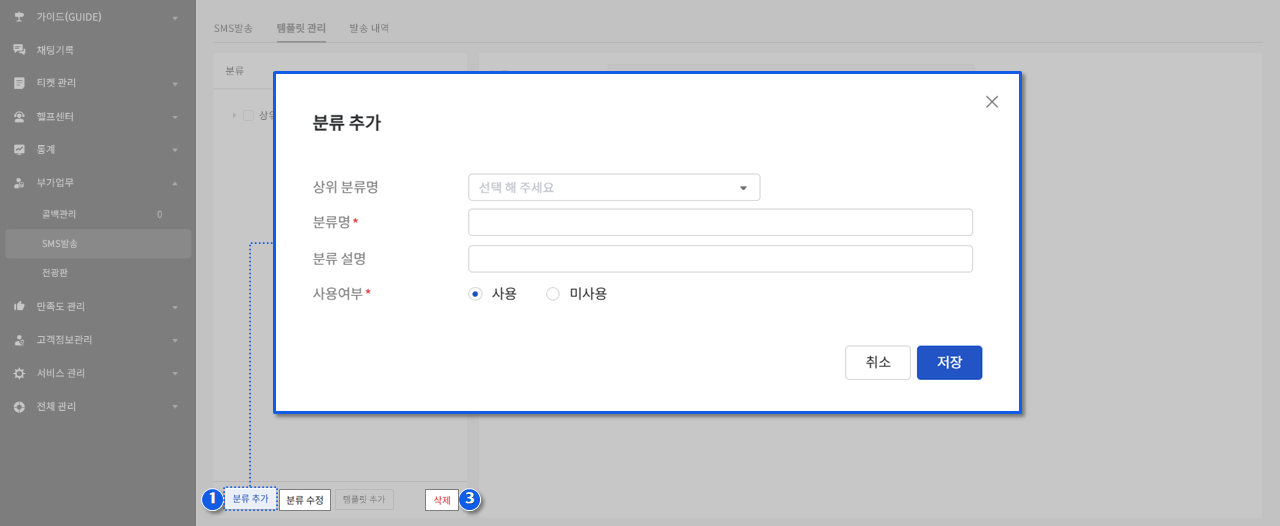
#### **① 분류 추가/수정**
* 템플릿 추가를 위해 먼저 분류 추가를 진행해주세요.
* 분류는 2단계까지 구성할 수 있습니다.
* 2단계 분류를 추가하려는 경우, 상위 분류명을 선택해주세요. (선택한 분류의 하위로 추가됨)
* 단, 템플릿은 2단계 분류의 하위로만 생성할 수 있습니다.
* **분류 수정**을 클릭하여 분류명 또는 사용 여부를 수정할 수 있습니다.
* 미사용 설정 시, 해당 분류의 하위 템플릿은 사용 설정되어있더라도 미사용으로 판단됩니다.
* 미사용 설정한 분류와 그 하위 템플릿은 SMS 발송 템플릿 목록에 노출되지 않습니다.
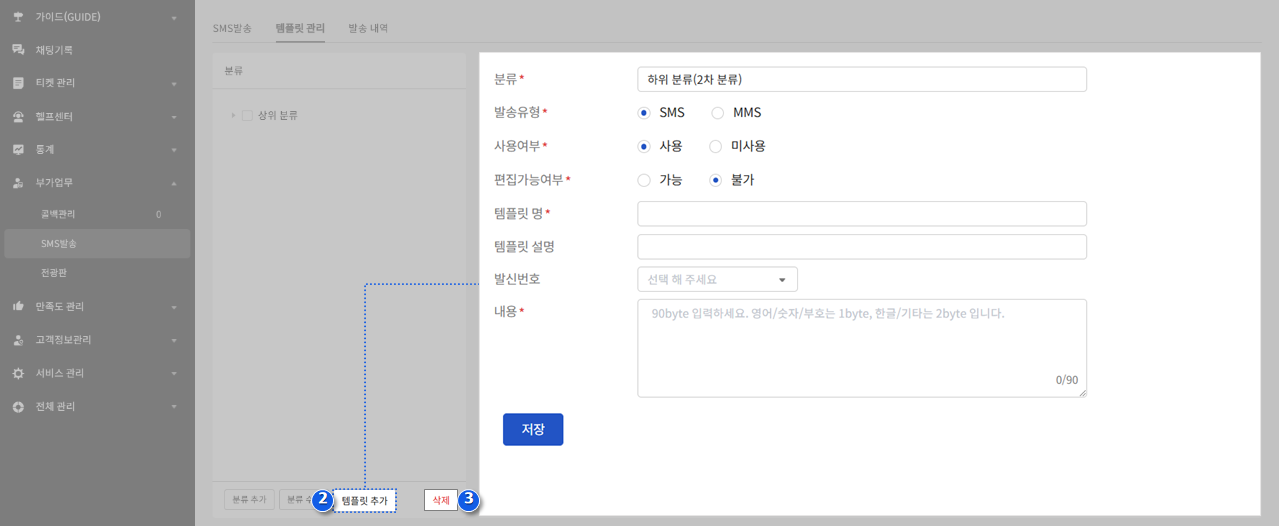
#### **② 템플릿 추가**
* 템플릿을 추가할 2단계 분류를 선택 후, **템플릿 추가** 버튼을 클릭합니다.
* 활성화된 우측 템플릿 추가 화면에 내용을 입력합니다.
> **템플릿 추가 화면 항목 설명**
>
> * 발송 유형 : 90bytes 이하 단문인 경우 SMS, 초과하거나 이미지 첨부가 필요한 경우 MMS
> * 사용 여부 : 문자 발송 시 템플릿 선택 드롭박스 목록 노출 여부
> * 편집 가능 여부 : 문자 발송 화면에서 템플릿 내용 수정 가능 여부
> * 템플릿 명 : 템플릿 이름
> * 템플릿 설명 : 템플릿 용도 등 필요한 설명
> * 발신번호 : 메시지를 발송할 발신번호 선택 (\[서비스 관리] → \[외부채널] → \[SMS]에서 발신번호 등록)
#### **③ 템플릿 삭제**
* **삭제** 버튼을 클릭하여 등록된 분류 또는 템플릿을 삭제할 수 있습니다.
* 분류를 삭제할 경우, 해당 분류의 하위 분류와 템플릿도 함께 삭제됩니다.
***
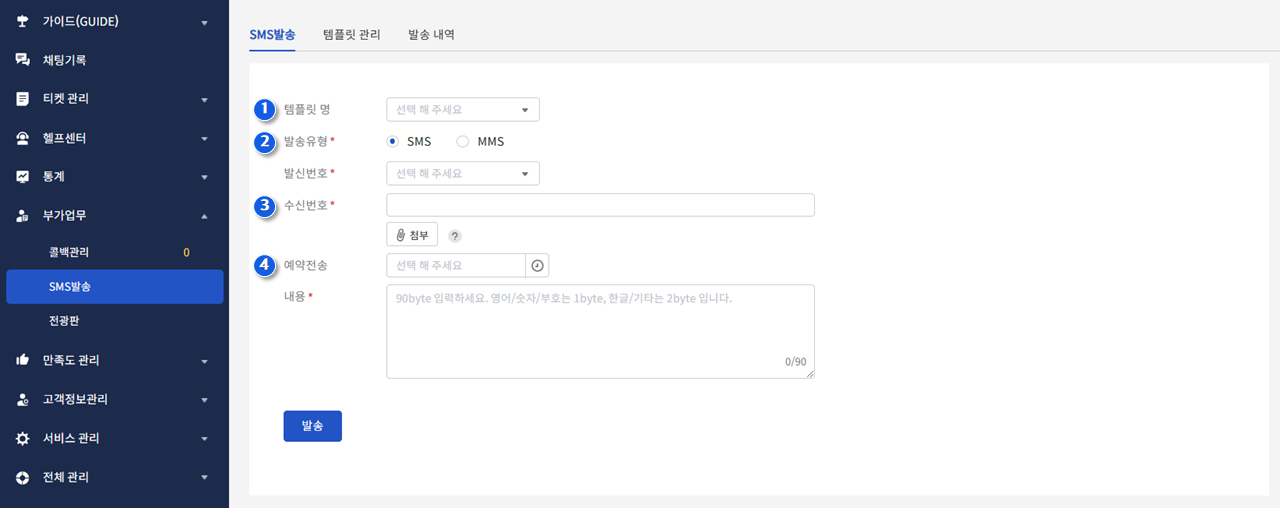
### **2-2. SMS 발송**
> SMS/MMS를 발송하는 메뉴입니다.
**① 템플릿명**
* 사전에 등록된 템플릿을 사용하려면 드롭박스를 클릭 후 선택합니다.
* 템플릿 등록은[ 2-1. 템플릿 관리 ](#id-2-1-1)설명을 참조해주세요.
#### **② 발송 유형**
* SMS/MMS 중 발송할 메시지 유형을 선택합니다.
* 90bytes 이하 단문인 경우 SMS, 초과하거나 이미지 첨부가 필요한 경우 MMS를 선택합니다.
* MMS의 경우 본문은 2,000bytes 이하만 작성 가능하며, 이미지는 0.3MB 이하 jpg 파일만 첨부할 수 있습니다.
#### **③ 수신번호**
* 고객의 수신 번호를 입력합니다.
* 10\~13자리 숫자와 콤마(,)만 입력할 수 있습니다.
* 콤마(,)를 구분자로 나열하여 복수 연락처에 문자를 발송할 수 있습니다.
#### **④ 예약 전송**
* 예약시간을 설정하여 특정 시간에 메시지를 전송할 수 있습니다.
* 예약시간은 현재 시간 30분 후부터 1일 이내까지 설정할 수 있습니다.
***
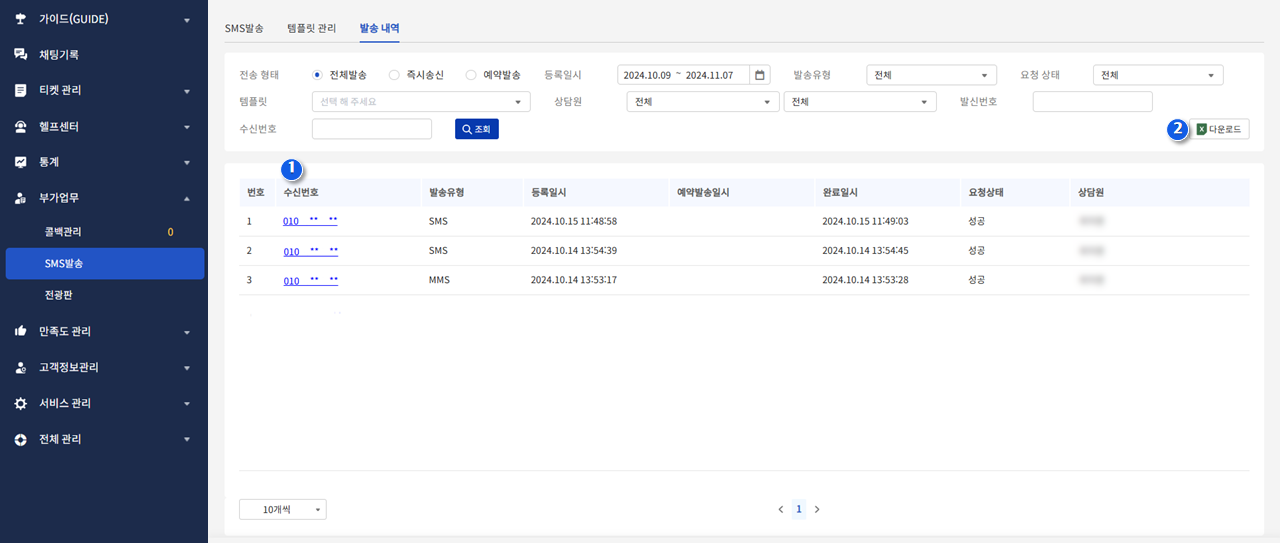
### **2-3. 발송 내역**
> SMS 발송 내역을 조회할 수 있는 메뉴입니다.
**① 상세 현황**
* 목록 항목 중 수신번호를 눌러 상세 현황을 확인할 수 있습니다.
* 아직 발송되지 않은 예약 발송의 경우, 요청 상태 항목에 취소 버튼이 표시되며 예약 발송 취소가 가능합니다.
#### **② 엑셀 다운로드**
* 다운로드 버튼을 눌러 조회된 데이터를 엑셀 파일로 다운로드할 수 있습니다.
***
## **➌ 전광판**
**서비스별, 상담원별 실시간 전화 상담 현황을 확인할 수 있는 메뉴입니다.**\
**CTI 연결 상태에서 조회 가능하며 별도 화면에서 모니터링이 가능하도록 UI가 구성되어 있습니다.**
### **3-1. 종합 현황**
> [**3-2. 매체별 현황**](#id-3-2-1) 화면과 [**3-3. 상담원별 현황**](#id-3-3) 화면이 5초 단위로 번갈아 표시되는 메뉴입니다.
***
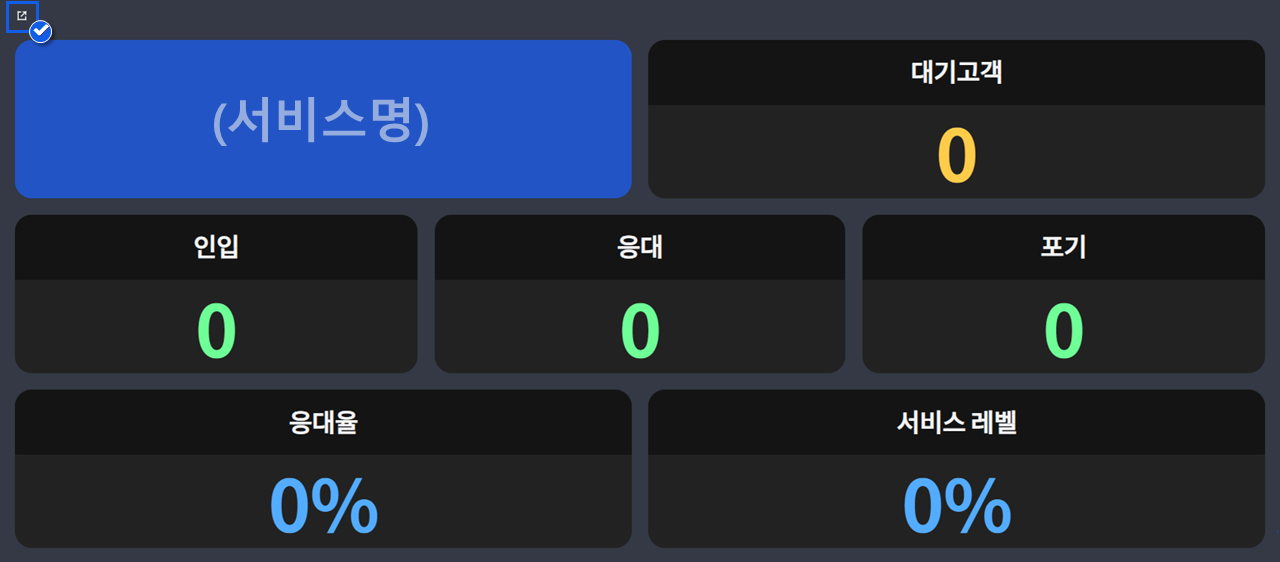
### **3-2. 매체별 현황**
> 서비스별로 실시간 전화 상담 현황이 표시됩니다.
* 팝업 아이콘을 눌러 새 창을 띄울 수 있습니다.
> **서비스별 현황 항목 설명**
>
> * 서비스명 : 콘티플 서비스명
> * 대기 고객 : 현재 상담원 연결 대기 중인 고객 수
> * 인입 : 총 인입호 수
> * 응대 : 총 인입호 중 응답호 수
> * 포기 : 총 인입호 중 포기호 수
> * 응대율 : 응대/인입\*100
> * 서비스 레벨 : 총 인입호 중 서비스 레벨 이내 응답호 수/인입\*100
***
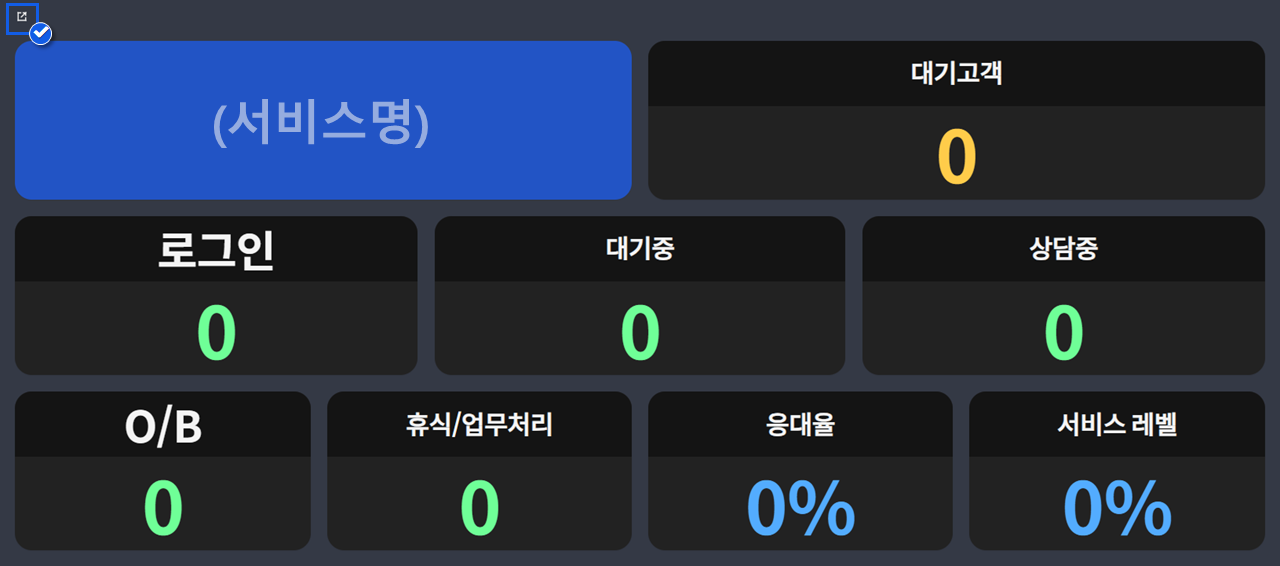
### **3-3. 상담원별 현황**
> 접속 중인 서비스의 상담원별 실시간 전화 상담 현황이 표시됩니다.
* 팝업 아이콘을 눌러 새 창을 띄울 수 있습니다.
> **상담원별 현황 항목 설명**
>
> * 서비스명 : 콘티플 서비스명
> * 대기 고객 : 현재 상담원 연결 대기 중인 고객 수
> * LOGIN : 현재 로그인 중인 상담원 수
> * 대기중 : 현재 대기 중인 상담원 수
> * 상담중 : 현재 통화 중인 상담원 수 + 현재 벨 울림 중인 상담원 수
> * O/B : 현재 발신 통화 중인 상담원 수 + 현재 발신 다이얼링 중인 상담원 수
> * 휴식/업무처리 : 현재 휴식 또는 업무처리 중인 상담원 수
> * 응대율 : 응대/인입\*100
> * 서비스 레벨 : 총 인입호 중 서비스 레벨 이내 응답호 수/인입\*100